Photography Class
Bong S. Eliab
First Semester
Humanities Division
School of Arts and Sciences
Ateneo de Davao University
Syllabus | Notes | Papers | Projects
Making Good PhotographsFlash PhotographyThere are two reasons to use a flash:
Flash units come in three types:
The secret of making good flash photographs is to know how brightly your flash will illuminate your subject. Obviously, brightness is a function of distance. Most flash units come with an exposure computer attached. To find the correct aperture setting, slide the distance scale to indicate your flash-to-subject distance. All exposure computations for flash photography are based
on the formula: A guide number is a unique value for every film-flash combination. For instance, if a small flash unit has a guide number of 45 when using ISO 64 film, and you wish to photograph a subject 11 feet away, divide 45 by 11 and obtain F-4 as your aperture setting. If you were to use that same flash unit with a film rated at ISO 125, the guide number would be 80. Thus, in an identical situation, using the higher speed film, you would set your aperture to approximately F-8.
The guide number is a measure of how powerful a flash is for a given film. For automatic electronic flashes, the guide number indicates the maximum power available. A flash bulb is a glass sphere filled with tiny wires and (usually) pure oxygen. When an electrical current is applied to the wires, they burn very quickly and brightly. But not too quickly. A flash bulb requires several thousandths of a second to burn, perhaps as much a 30 ms from ignition to peak light. An intensity plot of a bulb would look like this: Now let's look at electronic flash. An electronic flash consists of a glass tube filled with exotic gases through which an electrical current passes, causing light to be emitted. The major difference between bulbs and electronic flashes is speed. An electronic flash can fire to full brightness in as little as several millionths of a second. A graph of its intensity might look like this: This difference in speed is the reason many cameras have two flash connections: one marked X for electronic flash and another marked B for bulb flash. The bulb contact will actually close first, allowing the flash bulb to burn a few milliseconds to reach peak light before opening the shutter. The X contact fires an electronic flash at the instant the camera shutter is wide open. The camera opens the shutter, fires the flash, and closes the shutter. The guide number for an electronic flash includes all of the light created during the entire life of the flash. However, for bulb flashes, the shutter speed is a component of the guide number: If you ever need to use bulb flashes, the box of bulbs will indicate exactly which guide number to use for each film and shutter speed combination. Automatic Electronic Flash An automatic electronic flash includes a reflected light meter to control the quantity of light it produces (or, for dedicated flashes, uses a meter in the camera). To use an automatic flash, you adjust controls to tell the flash unit what film speed you are using and the aperture setting. Then, during the actual flash, an electric eye measures the quantity of light being reflected, and when that value reaches your setting the flash turns itself off. All of this happens in several millionths of a second. To use an automatic flash, be sure to set it with the ISO film speed of your film and, most importantly, be sure that your subject-to-film distance does not exceed the capabilities of the flash. When to Use Flash A flash allows the photographer to control the lighting situation. If insufficient natural light is available, use a flash to increase to overall illumination. Also, very importantly, a flash may be used to alter the effects of natural lighting. For instance, pictures taken of people outside on a bright day often show the poor subjects squinting for all their might. A good solution is to move your subjects into the shade and use flash to fill in the shadows. Whenever your subject is illuminated by two or more sources of light, figure your exposure on the brightest source.
A common problem when using flash to photograph people is the dreaded Red Eye. This occurs when the flash is too close to the camera and the light from the flash is reflected directly back from a person's eye. The cure is to provide more space between the flash and the camera. This may be accomplished with a flash bracket to attach to your camera, or with extension cords and other gear. In a related vein, no law states that the flash must be attached to the camera. Some very pleasing pictorial effects may be created by moving the flash off camera. In portraits, this adds some relief to a person's face. Many small cameras have built-in flash units that are woefully inadequate. Supplementary flash units can be purchased for reasonable amounts. These secondary units are triggered by the flash of light out of the built-in unit. They may be used even if your camera does not have a plug for an outside flash. If you ever have the opportunity to buy a new flash, my advice is to get the most powerful one you can afford. You can't have too much light. If I had to choose, I would put more money into a flash than I would into a camera.
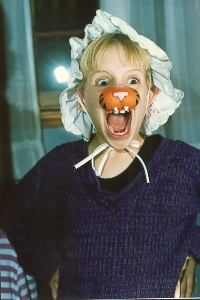
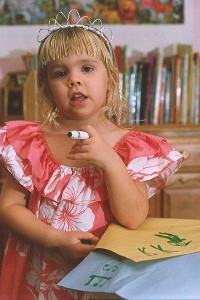
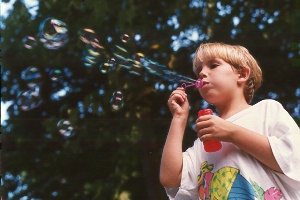
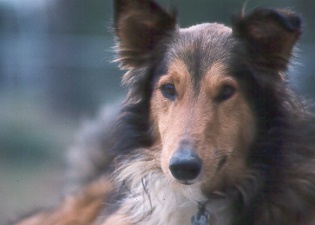
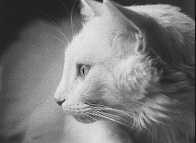
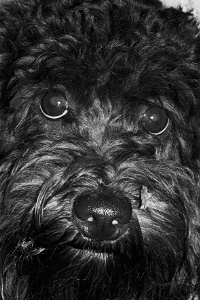
As a final note, beware of reflections when using flash. Many surfaces not normally thought of as reflectors present a dazzling, and disturbing, reflections when illuminated head-on with a flash. Furniture, tile, and paneling are some examples. Week Three:Photographing Children and PetsPhotography of children and pets present similar problems. Neither can be as fully controlled as an adult, and both are short. Since you cannot control your subject in the traditional sense, you must manipulate them so they naturally do as you wish. A child or a dog is not going to sit still unless something holds its attention. Be creative. Photograph your pets while they are playing, sleeping, or eating. Enlist the aide of an assistant to provide a distraction while you make your photographs. With children, allow them to play with a favorite toy, or present them with a treat. Bubble solution is a good prop. Also, with small children, make a small wade of tape, sticky side out, and stick it on their hand. This will usually generate delightful expressions as they try to get it off. A key factor in photographing children is to allow them to pose while entertaining themselves. Don't try to manipulate them directly. Ideally, they should forget that you are there. This will require patience on the part of the photographer. Keep your photo sessions short, and do not make a big production of getting out the camera. A child's behavior before a camera can be ruined for life by a bossy photographer.
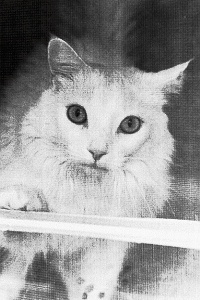
With pets there is more leeway. However, you can still make yourself a pest and teach your dog or cat to disappear when you arrive with a camera. To photograph pets you must be willing to move when they move, and make the most of each situation. Rather than trying to bend their will, if they move out of reach, put your camera away for another day. Earlier we mentioned that both children and pets are short. This is important. Get down low! Squat, lie down, sit. Do whatever is necessary to get on their level.
For the most natural photographs, avoid the use of flash. You can hardly be unobtrusive in your photography of children and pets if your subjects are slowly going blind from your flash. Sometimes, of course, this is neither desirable nor practical. However, when you must use flash, keep your photo session short. With cats, for instance, you will probably only get off one flash before your subject evaporates.
Incidentally, if your are photographing a child whose modeling behavior has been ruined, you might find it useful to borrow a second electronic flash and use it as a distraction. Fire the second flash unit (without the camera) and the child will instantly relax and display a more natural expression. Then, if you're on your toes, you can quickly snap the real photograph with your camera. In past weeks, we have mentioned the desirability of moving in close to your subject. This is nowhere more important than with your small subjects. Focus and frame carefully, and allow your pet or child to fill the frame. As a last word, one idea that usually results in good photographs, is to have your child and pet play together. Each will totally absorb the other's attention and you will be left free to concentrate on your photography. Exercise 3.0
|
Syllabus | Notes | Papers | Projects
All Rights Reserved 2001
Ateneo de Davao University
10 June 2002